woman-holding-a-diy-halloween-candy-skeleton-bowl-1.jpg

DIY Halloween Skeleton Candy Bowl (Cheap Pottery Barn Lookalike Craft!)

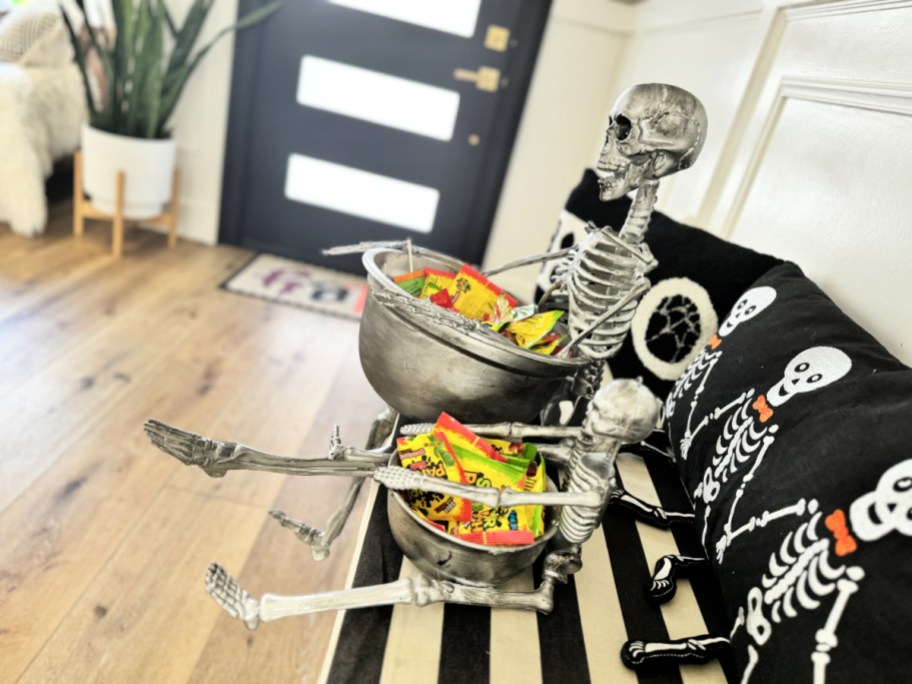
Create this spooky skeleton candy bowl as an easy craft project using an inexpensive plastic skeleton and bowl! 

woman holding a diy halloween candy skeleton bowl

No bones about it, Halloween crafts are so much fun!

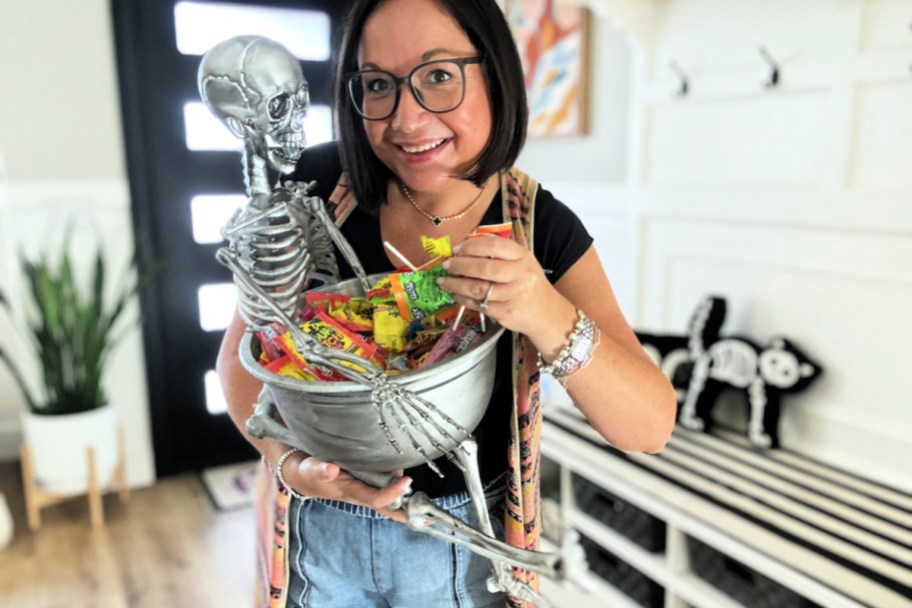
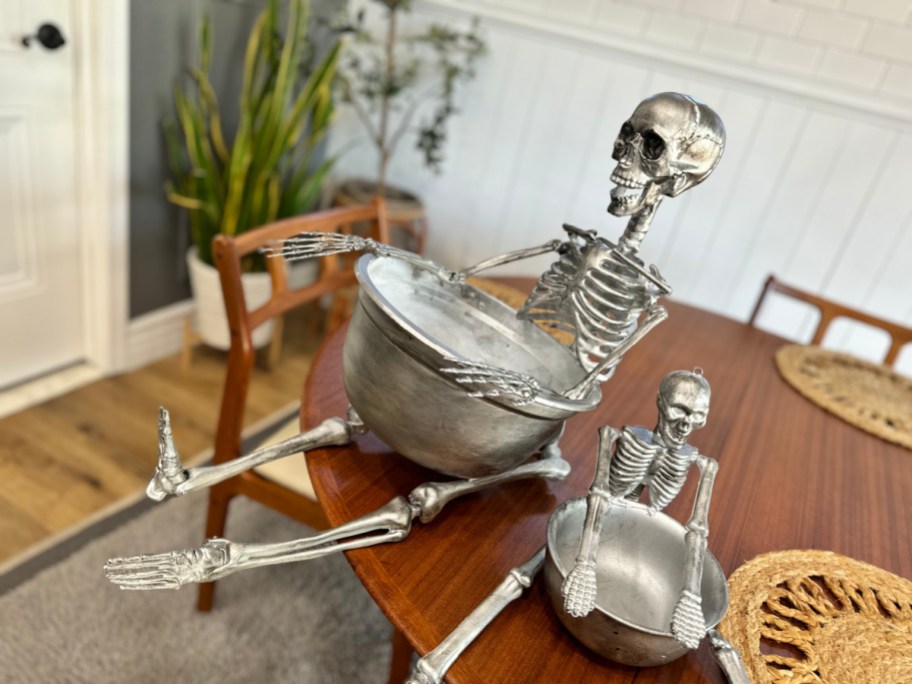
This easy lookalike Pottery Barn skeleton bowl idea is the perfect DIY to prepare us for trick-or-treaters. You’ll be able to use this spooky bowl to hand out candy on the big day or display Halloween decor at your party. I love that it’s a fairly easy glue and spray-paint project that anyone can do.

pottery barn skeleton bowl

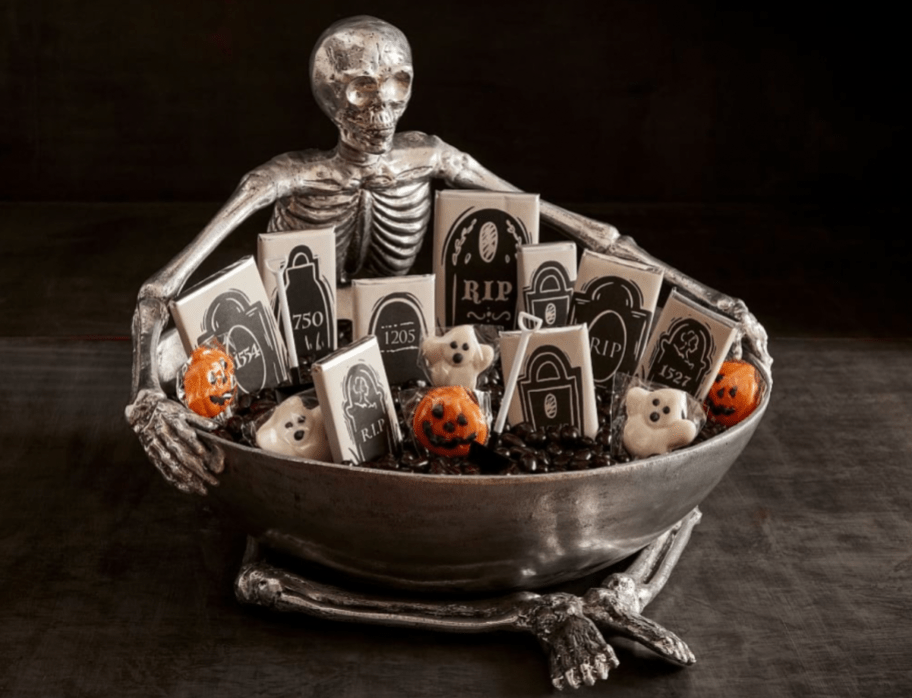
Let’s get this silver and black Pottery Barn look for less.

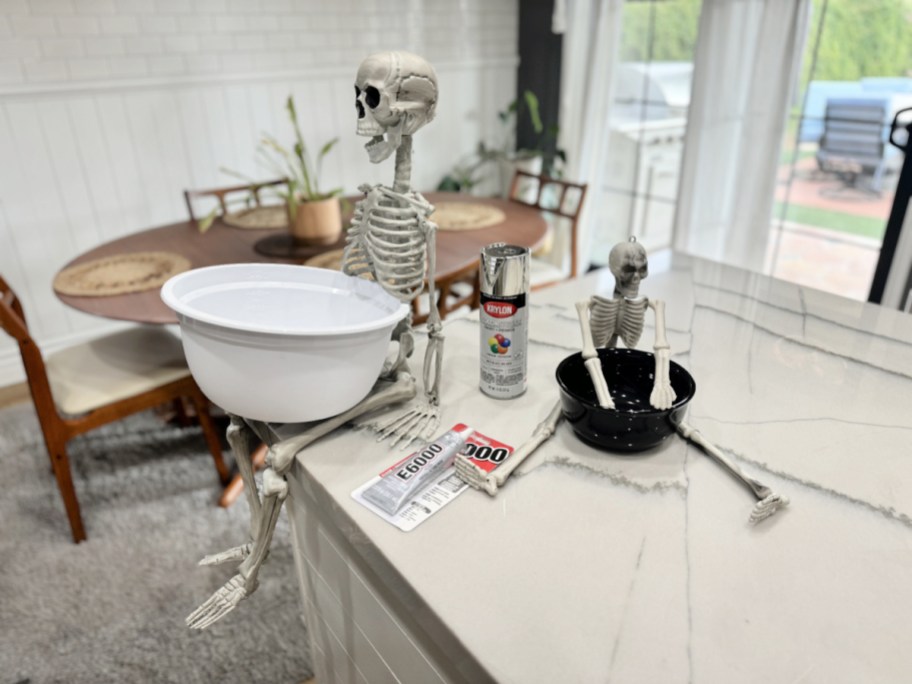
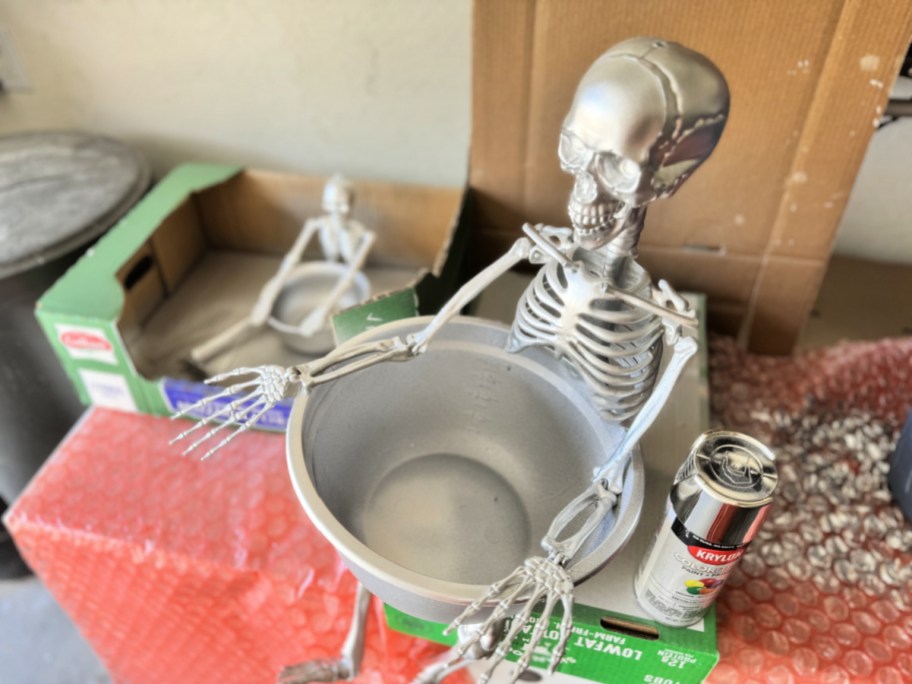
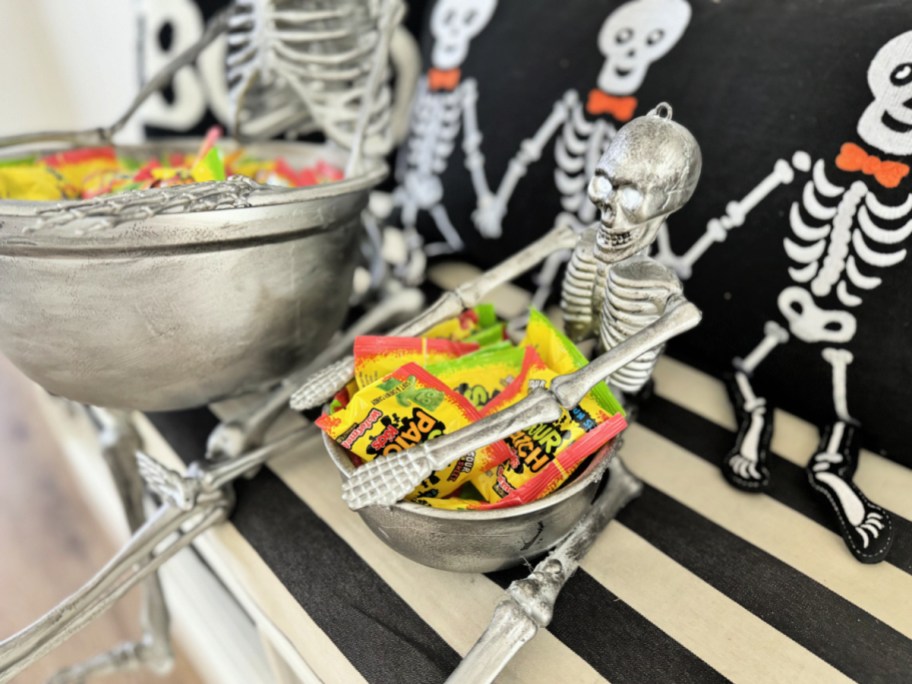
Mine looks somewhat similar to the $200 bowl, but I spent less than $20 on it!  Plus, I made a little Dollar Tree version using a small plastic skeleton and bowl from Dollar Tree. You can make this idea work for any budget. I picked up the 35-inch skeleton from Michaels and used a $2 plastic 6-quart mixing bowl from Walmart.

skeleton bowls by the front door with halloween candy

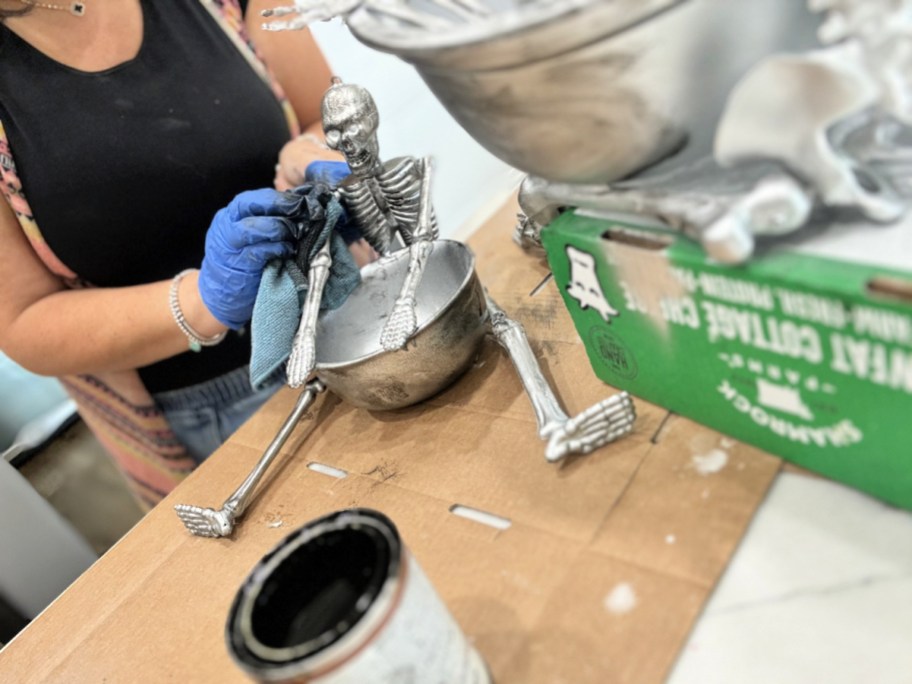
To get this look glue a plastic skeleton holding a bowl, spray paint it silver, and then use a rag to apply some black stain or paint to make it look like a darker metal similar to the Pottery Barn version.

skeleton bowl craft supplies on the counter

gluing a skeleton to a bowl

spray painted bowl with glued skeleton

spray painted skeleton bowl

rubbing stain onto plastic skeleton

staining skeleton bowl with black stain

empty skeleton bowls on the table

large and small diy skeleton bowl


DIY Halloween Skeleton Candy Bowl


Print

Directions

1

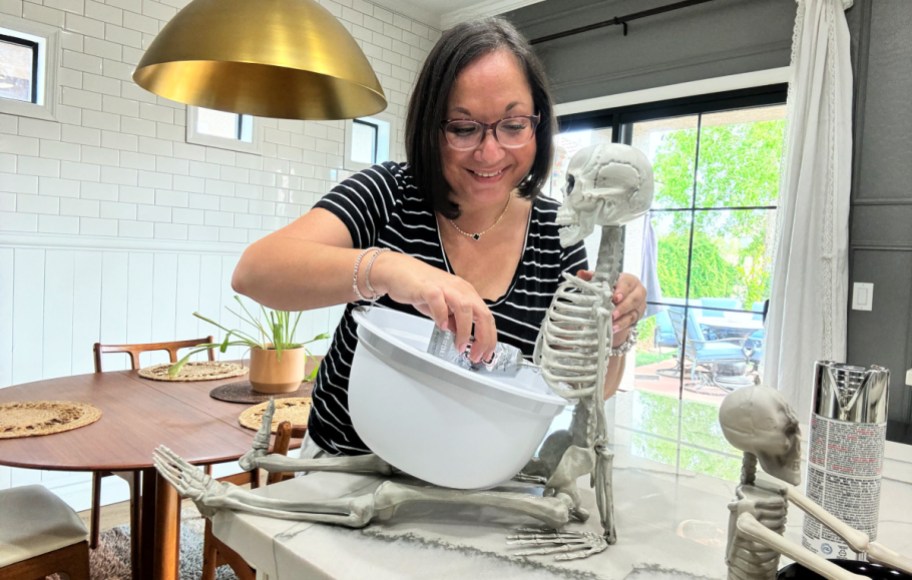
Use glue to attach the bowl to the skeleton. Glue the hands to the front of bowl as if the skeleton is holding it. Let dry.

2

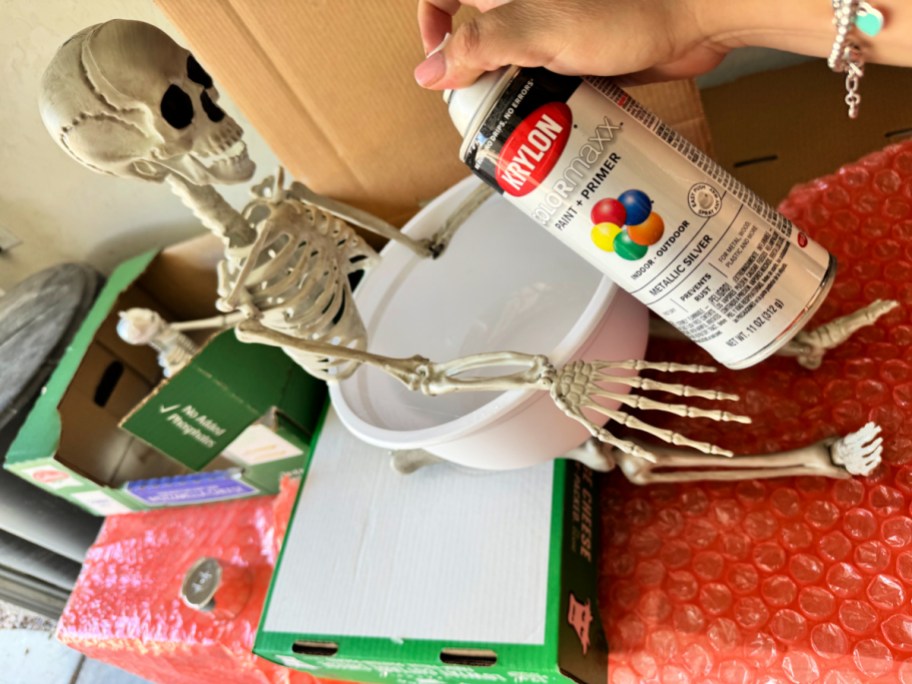
Spray paint the bowl and skeleton silver. This will take a couple of coats. Let dry.

3

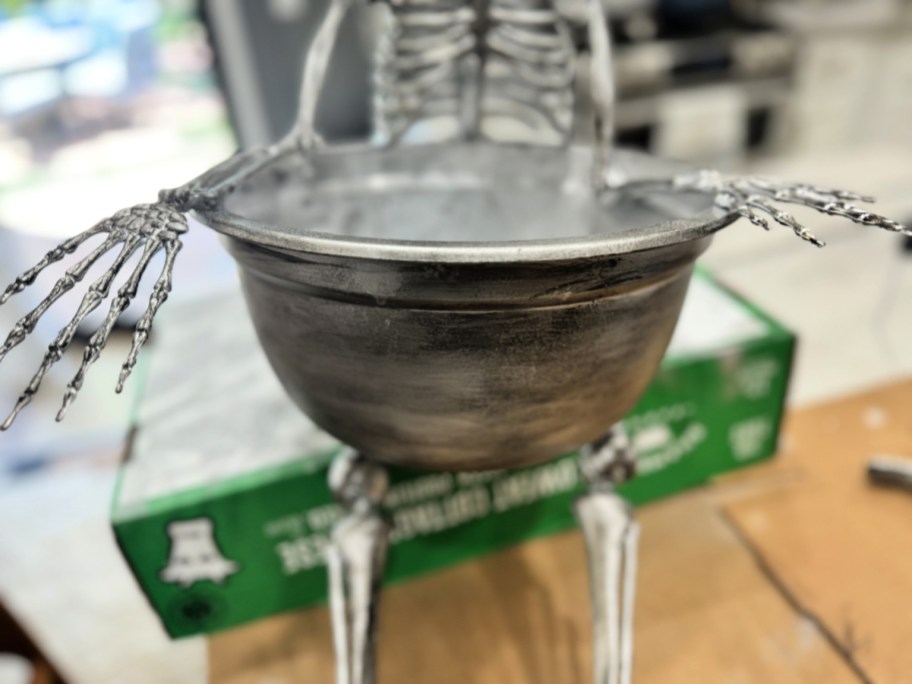
Use a rag with stain or watered-down black paint and wipe the skeleton and bowl to add dimension and texture. The goal is not to paint it black but rather to add darker black color in the details of the bowl.

4

Optional step of spraying with clear spray paint to protect the project. Let dry and add candy of Halloween decor to your bowl for Halloween!


Extra tips for creating a lookalike Pottery Barn candy bowl:

  • Before buying any supplies check to see if you already have similar hanging skeletons in your Halloween stash! You can experiment with different-sized bowls and variations. This could be a thrift store makeover opportunity as well.
  • If you opt for adhesive like I used, it does take a bit of time to hold the skeleton on the bowl for it to dry. Maybe opt for hot glue first as it’s probably easier and quicker!
  • I had a can of clear topcoat spray paint on hand and used it as a last step to protect the paint from peeling and scratching. This is optional but the project will likely last longer.

diy skeleton bowl craft project halloween

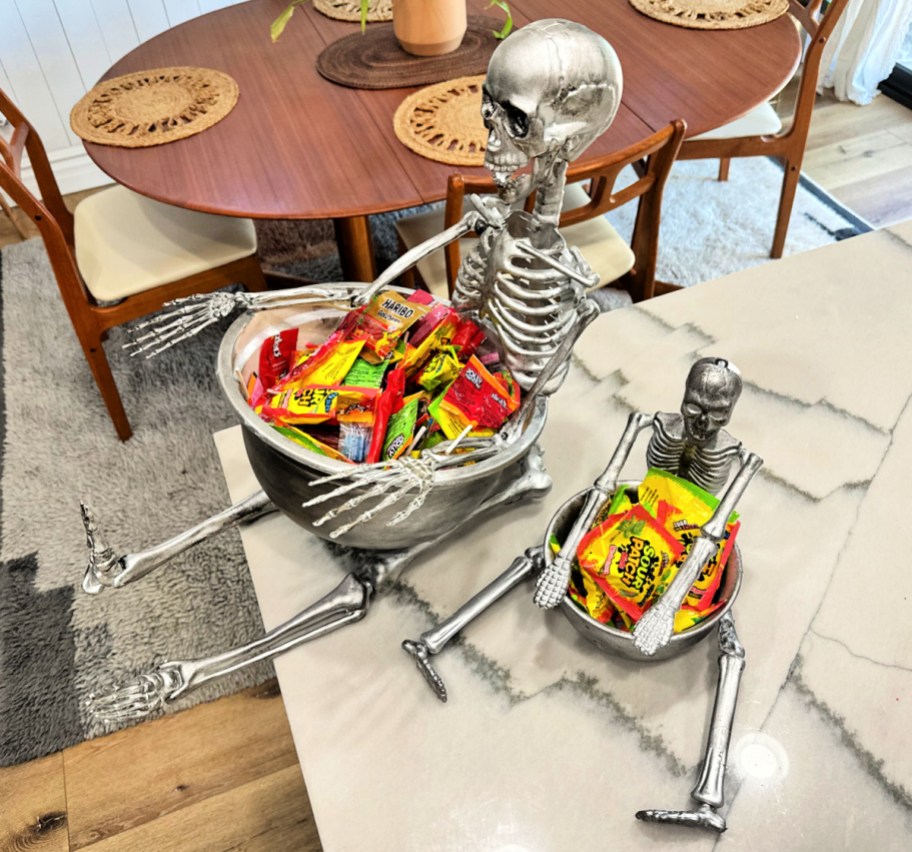
How fun are these adorable candy bowls?! 

This is so great for a Halloween party or to display wrapped candy for trick-or-treaters. It does look more expensive than it is too.

What do you think? Would you like to make one too?  Let us know in the comments if you have made this project or anything similar! Happy crafting.


Check out this Pottery Barn-inspired DIY skeleton cutting board from last year! 

diy-dollar-tree-leaf-dish-makeover-.jpg

Turn a $1 Dollar Tree Leaf Dish into Cute Fall Decor with Spray Paint!

This simple Dollar Tree fall decor DIY uses plastic maple leaf dishes and spray paint for an adorable autumn tray.

diy dollar tree leaf dish makeover

Ready to get going on your fall home decor?!

I’m sharing how I made these $1 plastic Dollar Tree maple leaf dishes into pretty fall decor pieces using just spray paint! This Dollar Tree fall DIY is a super easy craft anyone can do, and the price is right for this inexpensive project.

The result is a beautiful, rustic farmhouse-style piece that looks much more expensive than $1. Plus, you can style and display it on a shelf or mantel as part of a fall vignette.

Does Dollar Tree sell spray paint?

You won’t find spray paint for sale at Dollar Tree, but to keep your DIY frugal, you can spray paint for an affordable price at these store recommendations:

Hip Tip: If you have an unsteady hand, try using a Rust-Oleum Spray Grip. It makes it even easier to spray paint, and is less than $5!

Tips for making these Dollar Tree maple leaf dishes:

  • Try these awesome spray paints I used! I used this Rust-oleum Chalked in linen white for the first time and love the matte texture. It’s so beautiful, and it sprayed on this Dollar Tree fall decor very even and smooth. The blue leaf is Rust-Oleum in ocean mist color. I love that minty blue!
  • Apply several light coats of spray paint. I know it’s super tempting to keep spraying, but if you can do a few light coats and let them dry in between, it’ll look great!
  • Sand the edges for a rustic farmhouse look! I used a light grit sanding block and paper to add character around the edges.

Dollar Tree plates next to a can of chalk paint

spray painting a plastic leaf blue

sanding the edges of painted dollar tree dish

spray paint and leaf dishes on counter


Dollar Tree Leaf Dish Makeover


Print

Directions

1

Spray paint the back and front of your Dollar Tree leaf dish. Do several light coats as needed. Let dry.

2

Once dry, gently sand the edges around the leaf to reveal a little of the underneath color. Note this is optional for a more rustic look.

3

Display on shelf or mantel and style with pumpkins and other fall decor.


diy leaf bowl on the mantel

I’m FALL-ing for this Dollar Tree fall decor leaf craft for sure!

Aren’t these maple leaves so cute? This Dollar Tree fall DIY continues to please year after year! These leaves look like they came from a more expensive home decor boutique, rather than the dollar store!

painted fall leaves from dollar tree styled on mantel

I just love using spray paint for an instant makeover, especially on Dollar Tree items. It’s so easy to incorporate your Dollar Tree maple leaves into your own fall decor by styling them with small pumpkins like I did above – so cute!

Check out more of our frugal crafts and DIYs!

cate-chloe-2.jpg

Cate & Chloe Pendant Necklace Only $18 Shipped | Comes in Gift Box!

Add a new Cate & Chloe necklace to your collection!

three oval necklaces in gift boxes

For a limited time, dash over to Cate & Chloe where you can score the Zelda 18K White Gold Plated CZ Crystal Pendant Necklace for just $18 shipped when you use promo code HIPZELDA18 at checkout!

Grab this stunning necklace for less…

cate and chloe zelda necklace in hand next to gift boxes and a rose

Cate & Chloe Zelda 18K White Gold Plated CZ Crystal Pendant Necklace $39.99 (regularly $150)
Use code HIPZELDA18
Final cost $18 shipped!

This necklace features a unique oval-shaped stone surrounded by layers of sparkling crystals. You can choose between white gold, yellow gold, or rose gold. Or grab a few to gift as the promo code works on more than one necklace!

Better yet, like all Cate & Chloe jewelry, this one comes in a ready-to-gift box, and is hypoallergenic and lead and nickel-free so you can safely gift to anyone on your list!

woman pointing at necklace in gift box

The Hip2Save team LOVES Cate & Chloe jewelry! 

“This necklace has such a sharp design. This jewelry elevates your look without taking it over. This piece is also so versatile! Both teens and adults can wear this piece to a variety of events.” – Hip Sidekick, Kara 

bracelet-stacks.png

Bracelet Stacks from $6.39 on Amazon (Regularly $17) | Tik Tok Trend For Way Less

Add some cute new bracelets to your bracket stack with this deal! 

bracelet stacking

Through August 30th, rush over to Amazon where you’ll be able to score these trendy stackable bracelet sets for as low as $6.39 (regularly $17) after you clip the digital coupon and enter the promotional code 5023ADOYI at checkout! Plus, Prime members get free shipping!

a woman wearing adoyi stackable gold bracelets for women

adoyi Bracelet Stack Sets as low as $12.79 (regularly $17)
Clip the 10% off digital coupon
Use promo code 5023ADOYI
Final cost $6.39! 

*Note digital coupon amount may vary by set 

a woman wearing adoyi stackable gold bracelets for women

These fun bracket stacks made popular on Bama Rush remind us of the much spendier Enewton products that go for $42+ for just ONE bracelet!

This stackable bracelet set is stylish for all ages. It would especially make a fun back-to-school gift for your teen or tween and would pair well with a fun friendship bracelet.

adoyi Bracelets for Women with packaging

Check out these rave reviews…

I bought these because I wanted the look of Enewton but I couldn’t stomach paying that much $$$$! These came quick and they’re very good quality with a nice weight to them. The stack looks great and I couldn’t be happier! Definitely worth the purchase.


I didn’t have high expectations for these bracelets, but they are great!!! They are made of some type of metal, not plastic. They dress up my outfit perfectly.


This was exactly what I was looking for! These bracelets are so cute and are exactly like the pictures!!! I love them and would definitely recommend!

Head this way for even more fabulous Amazon deals for women…

Shipping Info

Amazon

Get free shipping on most $35 orders OR snag free 2-day shipping on ANY size order with Amazon Prime (you can sign up for a FREE 30-day trial here).

Note your Amazon shipping selection may default to non-Prime shipping, so be sure to double-check your shipping options before checking out.

Prime members also score Free One-Day Shipping on millions of products! Check out even more of the best Amazon Prime benefits here!

Cate-Chloe-Mallory-18K-White-Gold-Plated-Stud-Earrings.jpg

Cate & Chloe 18K Gold Plated Stud Earrings Only $18 Shipped (Perfect for Sensitive Ears!)

Add a little dazzle with a new set of Cate & Chloe earrings!

hand holding a set of boxed stud earrings

For a limited time, head over to Cate & Chloe where they are offering these Mallory 18K White Gold Plated Stud Earrings for just $18 shipped when you use promo code HIPMAL18 at checkout!

Snag a pair w/ this deal…

Cate & Chloe Mallory 18K White Gold Plated Stud Earrings $39.99 (reg. $108)
Use promo code HIPMAL18
Final cost $18 shipped!

three pairs of earrings in gift box sparkling in sun

These eye-catching earrings feature a 5mm round-cut stone and are available in white, gold, and rose gold color options. They have a secure butterfly back closure and they’re hypoallergenic, lead- and nickel-free, making them a great choice for even sensitive ears. Plus they come in a box that’s ready for gifting!

Check out a few of these 5-⭐️ reviews…

If you need some everyday cute sparkly stud earrings that will go with everything, these are it! They look very realistic like diamonds and are so pretty. My daughter is a fan of them too! – Hip Sidekick, Lina


Great for my sensitive ears, I can wear them all day! They are the perfect everyday stud. They are not too big, not too small, and are perfect to wear in my first hole and complement the 2nd and 3rd piercings.


I was really astonished at how nice these look and how comfortable they are. Usually, I can’t wear earrings for long because I have sensitive ears, but I’ve been sleeping in them and I don’t even feel them. Pretty good quality, and the price is too good almost for what you get compared to others that are similar.

holding-detergent-for-laundry-stripping-.jpg

How to Strip Laundry + Try Our Laundry Stripping Recipe (It’s Better Than Bleach!)

Learn how to strip laundry! Our easy 3-ingredient laundry stripping recipe is more powerful than bleach!

holding detergent for laundry stripping

Ever heard of laundry stripping?

I really hadn’t either until I started seeing murky water videos and pics trending on TikTok and Instagram back in 2020.

People were soaking their towels in bathtubs filled with hot water and a laundry stripping recipe, and then showing how the water would turn dark. It’s sort of gross yet satisfying at the same time!  😂

laundry stripping

The more I researched how to strip laundry and detox clothes, I actually started to see lots of savvy cleaning sites have content surrounding the concept. So it isn’t a new topic, but I had never tried it myself and wanted to give a laundry stripping recipe a shot!

Honestly, laundry is NOT one of my favorite chores. In fact, it may just be my least favorite household activity, but seeing intriguing videos of laundry stripping suddenly perked my interest and motivated me to try it!

Are you a visual learner? I was so excited to give this a try that I even created a video showing how to strip laundry:


laundry stripping towels

What is laundry stripping? 

Learning how to strip laundry? It’s all about getting the stink and funk out of fabric! The idea is to soak and detox clothes, workout gear, sheets, and/or towels in water for a long time using a powerful mix of Borax, washing soda, and powdered laundry detergent. Bacteria, body oils, dirt, and fabric softener build-up, get released along with the hard-to-remove stinky smells.

It’s crazy how even CLEAN white sheets and towels can have such a build-up and create dark water when soaked! 

Below is a photo of my clean towels after 5 hours of soaking! Eww! 🙈

murkey water from stripping towels

Here’s how to strip laundry and detox clothes, towels, and linens…

The process involves filling a bathtub or a top-loading washer with hot water and then adding in the Borax, washing soda, and powdered detergent mixture. Then you can add in your sheets, towels, or workout clothing and let everything soak for 4-6 hours. Lastly, wash and dry like normal.

According to DailyMail.com, this 3 ingredient laundry stripping recipe is more powerful than using bleach!

3 ingredient laundry stripping method

For this laundry stripping recipe, you’ll need 1/4 cup Borax + 1/4 cup washing soda + 1/2 cup powdered detergent:

  • Borax is a popular laundry booster for lifting acidic stains, making fabrics whiter, and dissolves great for this soaking technique.
  • Washing soda or sodium carbonate is also great for soaking hard-to-remove stains due to its high alkalinity and helps to remove hard water build-up in the laundry. In case you have a hard time finding it, I found my Arm & Hammer washing soda at Walmart, and it seems readily available there.
  • It’s recommended to pick a powdered laundry detergent as it will dissolve easier than a concentrated liquid one. I am using powdered Tide, and if you need an allergy-friendly option then consider Tide Free & Gentle (or your favorite brand) instead.

Hip Tip: Mixing hot water and a small amount of powdered laundry detergent is actually another popular hack for cleaning up carpet and upholstery stains. As always, you’ll want to test a small area first. 

woman holding white towels

filling a bathtub with water

stripping towels in the bathtub

mixing laundry with end of broom

putting towels in the washer


Laundry Stripping Recipe


Print

Directions

1

Place towels or clothing in a bathtub or top-loader washer and cover with HOT water.

2

Mix Borax, washing soda, and powdered detergent together. Sprinkle the mixture over the contents in the water.

3

Mix the apparel, bedding, and/or towels around in the laundry stripping solution and let soak for 4-6 hours, making sure to mix once every hour for as long as they soak. I actually used the end of a broomstick because my water was too hot to touch!

4

Drain the water and transfer the contents to the washer. Wash and dry laundry like normal, except now you don’t have to add more detergent.

5

Enjoy your soft and clean laundry!


laundry stripping in the tub

Here are a few tips to consider when laundry stripping:

  • This is a pretty powerful deep-cleaning method that shouldn’t be used on delicates or anything needed to be washed gently. Reserve this laundry stripping recipe for ultra-stinky gym clothes, sports shirts, towels, and sheets. Also, if you do this on colored items, keep like colors together to avoid bleeding. That said, depending on your tub, this solution could stain the surface. This treat is better reserved for whites and light colors.
  • Reserve this method of stripping laundry every few months so it won’t damage your fabrics. This isn’t meant as an everyday laundry routine. Also keep in mind that I have affordable white towels from Costco, so if you have some expensive fancy ones, proceed at your own risk.
  • I did use this method to detox clothes and strip my husband’s often stinky white undershirts with success. They aren’t perfectly white, but do smell and feel clean now!
  • You don’t have to use a bathtub! I used mine because I don’t have a top-loading washing machine. You could also use a large bucket or put this laundry stripping recipe in a sink using the same ratio but smaller amounts of the recommended cleaning powders.

clean towels on the dryer

Now I’m searching for more things to wash with this laundry method!

This laundry stripping recipe is going to be helpful as I’d like to tackle some of my son’s funky-smelling football and baseball clothes next. My sister-in-law recently told me she used this same method in the sink to soak some of her husband’s hats that had a funky smell, which I think sounds smart, too!

sports apparel for laundry stripping

Share with us in the comments if you’ve tried this laundry stripping recipe! 


Here’s another way to wash sheets without bleach.

filing-system-for-kids-paperwork-e1706714017852.jpg

DIY School Paper Memory Keeper for Your Kiddo: Grab Your Free Printable Labels!

Wondering how to organize kids’ school papers at home? This DIY school paper organizer is easy & efficient!

filing system for school paper organization

Looking for a better way to organize your child’s school papers & memories this year? 📚🤓

Storing keepsake papers, awards, report cards, artwork, etc., can become so overwhelming for a parent. While you’d like to keep everything realistically, that isn’t always possible.

Unless you make a school paper organizer! This way, you can hold everything in one place and stay organized! Plus, it keeps your kiddo’s schoolwork from getting crinkled or destroyed.

Consider setting up a system before the school year starts so you can easily organize your memories all year long!

school paper organizer for kids' papers

How to organize kids’ school papers at home.

I want to say that I’m an organized person, but honestly, I’ve always struggled with paper clutter and knowing what to do with my children’s “stuff.” For instance, I have papers stashed in my office, the kitchen, their rooms, and even the garage.

With that said, I’m working on this school paper organizer project to get myself motivated to identify the BEST pieces to hold onto, and so far, it’s working!

finished school paper organizer storage bin

This easy filing system keeps only the very best memories of each school year and stores them all together in a plastic hanging file bin for each child. This paper storage solution has been such a helpful idea for me, and it’s working out great for our family!

I’m sharing these FREE printable labels and cover sheets so you can create a school paper organizer for your kids, too!

printables for school paper organizer

supplies needed to create school paper organizer

School organization storage file box


DIY School Paper Organizer


Print

Directions

1

Fill out the hanging file cover sheets for each grade including year, teacher, school, etc., and attach a school photo for each year. Glue or tape to the front of a hanging file.

2

Attach labels for each school year to file folders. If desired, you can create multiple file folders for each year and separate them into different categories such as schoolwork, artwork, awards, etc. File papers according to each grade level.

3

Label the bin with your child’s name. Feel free to use a marker, or save this blank label with a school supply border and open it in an image editor to add text. I used PicMonkey.com, an online editing tool, to add text to images. The font pictured is called Yesteryear.


woman pulling a paper from a school paper organizer bin

This school paper organizer is really easy to keep up with once you have it all set up!

If you’re wondering how to organize kids’ school papers at home, try this easy DIY project. Honestly, I wish I had done this storage system years ago when my first child started school. I love looking back at all my kids’ special writing assignments and memories, and I know that they will, too, in the future!


Stock up on school supplies with our best deals!

Arltansy-14K-White-Gold-Plated-High-Carbon-Diamond-Tennis-Bracelet-2.jpg

White Gold Diamond Tennis Bracelet Just $13.99 on Amazon

Save 70% off this pretty ARLTANSY tennis bracelet on Amazon!

person's hand wearing a diamond tennis bracelet

For a lmited time only, head to Amazon where you can snag this ARLTANSY 14K White Gold Plated High Carbon Diamond Tennis Bracelet for just $13.99 when you clip the digital coupon (regularly $39.99)!

Add this pretty tennis bracelet to your jewelry collection…

woman's hand with pink fingernails holding a silver diamond tennis bracelet

Arltansy 14K White Gold Plated High Carbon Diamond Tennis Bracelet  $13.99 (reg. $39.99) 
Clip the 40% off digital coupon
Final cost $13.99!

This 7.6-inch classic-style tennis bracelet features lab-created high-carbon diamonds. The stones are securely held by a four-claw setting and the bracelet has an adjustable length buckle for a customizable fit to make it shorter or longer.

The bracelet is made from 14k white gold plating and is hypoallergenic, nickel-free, and lead-free. It comes packaged in a gift box, making it perfect to gift for a variety of occasions. This bracelet gives the look of high-end jewelry for much less!

Check out what reviewers have to say…

This is a really beautiful tennis bracelet and the diamonds are a great size. It feels like a nice weight on my wrist and definitely looks quality. There is an extra link at the end that you can remove if you need to make it smaller. The clasp is standard and does not have a redundancy clip option. I would say it’s a good value for what looks to be a real diamond tennis bracelet.


The price of this tennis bracelet may make you think that it isn’t all that good. But it is. It’s a sincerely great value! The white gold plating is even, thick, and well-done. It looks great. The carbon diamonds shine brightly and are just the right size to look confidently pricey without being “loud” or overdone. It has adjustable links and the clasp snaps tightly closed. It looks expensive on and off and has a nice weight to it overall. If you’re looking for a bracelet that you can wear with an evening gown or dress-up jeans and a casual shirt, this one is an excellent choice. I wholeheartedly recommend this tennis bracelet and know you’ll love it too!!!

Shipping Info

Amazon

Get free shipping on most $35 orders OR snag free 2-day shipping on ANY size order with Amazon Prime (you can sign up for a FREE 30-day trial here).

Note your Amazon shipping selection may default to non-Prime shipping, so be sure to double-check your shipping options before checking out.

Prime members also score Free One-Day Shipping on millions of products! Check out even more of the best Amazon Prime benefits here!

DIY-Dollar-Tree-Halloween-Decor-.jpeg

Must-See: Halloween Doll House Makeover Using Dollar Tree Finds!

Turn a Dollar Tree doll house into spooky Halloween decor using spray paint and inexpensive craft supplies. 

DIY Dollar Tree Halloween Decor

If there is a craft trend that includes spray paint and Dollar Tree items I am all in! Last year, I noticed how many people were painting doll houses to look BOO-tiful for Halloween and I had to try it. Stick an LED light behind your mansion and it turns into a terrific display piece.

Make a few and you’ll have an inexpensive Halloween village!

two painted doll houses Halloween dollar tree craft

Honestly, this little craft was even more fun and satisfying than I thought it was gonna be! I highly recommend painting your own Halloween mansions this year as it’s such a great activity and something you can create on your own or in a large group.

doll houses from dollar tree

Host a Dollar Tree doll house decorating party!

It would be a blast to host a party and have everyone decorate a house, similar to gingerbread decorating at Christmastime. It would be so fun to see how different they all turn out, as there are no rules with this craft! Let your creativity flow.

I decided to spray-paint my house black and some plastic skeletons silver. Making stacks of mini pumpkins is easy to do using hot glue. Dollar Tree has a good selection of stickers and embellishments for this idea.

dollar tree doll houses

spray painted doll houses using spray paint

using a silver sharpie on a haunted mansion dollar tree doll house craft

using a silver sharpie to decorate dollar tree diy halloween decor

gluing a skeleton to a painted Halloween

finished black halloween painted doll houses

holding dollar tree led candles

dollar tree houses in the dark with lights


Halloween Decor Doll House Makeover


Print

Directions

1

Spray paint the doll house black or other desired color. Let it completely dry.

2

Embellish areas like windows and trim using a silver sharpie, or paint pen. Add any other decorations as desired.

3

Style your house or houses with other Halloween decor. Add a tea light or two in the back of the house to light up.


Extra tips for this Halloween doll house makeover:

  • I recommend starting with a base layer of spray paint on these. They don’t seem to take acrylic paint with a brush very well. I attempted that first.
  • A silver Sharpie seemed to work well over the paint! You can consider using other craft materials such as a paint pen, glitter, puffy paint, etc.
  • Adding little LED tea lights adds such a nice effect at night. Fairy lights could work too.
  • This concept is not limited to a Halloween idea. Consider painting them brown and white like gingerbread houses for Christmas. So cute!

halloween decor from dollar tree houses

I am in love with my little Dollar Tree doll houses turned Halloween decor.

No one would ever guess this was pink plastic before! This is inspiring me to dream a little bigger and maybe do a larger makeover on a thrift store doll house. That would make such a creative Halloween display on a larger scale.


Check out my festive jack-o-lantern decorated front door using Dollar Tree items! 

amazon-bubble-initial-necklace.jpg

Gold Bubble Initial Necklace w/ Gift Box Only $7.49 on Amazon

Score a trendy initial necklace for less on Amazon!

hand holding gold letter E necklace

Through August 20th, dash over to Amazon where you can score these Chunyee Gold Bubble Letter Necklaces for just $7.49 (regularly $12.99) after an automatic 50% off at the final stage of checkout when you use this exclusive Amazon link.

Treat yourself or someone else to this necklace…

hand holding letter A necklace in box

Chunyee Gold Bubble Letter Necklace $14.99
Less automatic 50% off at the final stage of checkout
Final cost $7.49!

Note that if the 50% discount doesn’t automatically apply, you can use promo code 50M8FKYV at checkout to snag the savings!

woman wearing letter D gold necklace

This cute necklace comes in many letters of the alphabet. It features a 17″ chain with a 2″ extension and is 18K gold plated making it resistant to tarnishing and hypoallergenic. Plus, it comes in a nice gift box making it perfect for gifting for any upcoming birthday!

Join our official Facebook Group to get daily deal alerts!

Shipping Info

Amazon

Get free shipping on most $35 orders OR snag free 2-day shipping on ANY size order with Amazon Prime (you can sign up for a FREE 30-day trial here).

Note your Amazon shipping selection may default to non-Prime shipping, so be sure to double-check your shipping options before checking out.

Prime members also score Free One-Day Shipping on millions of products! Check out even more of the best Amazon Prime benefits here!